This week, the Effektif team added two new BPMN features to Effektif, making it possible to automate more use cases. This article shows how you can use intermediate timer events and sub-processes in your processes.

To illustrate the new features, let’s return to the customer invoice processing example process, whose goal is to invoice a customer and get paid.

The main steps in the Invoice customer process flow are the send and invoice, wait for payment, and handle late payment if the payment terms period expires.
Intermediate timer event
In the Invoice customer process, there is a delay between sending the invoice and receiving payment from the customer. The agreed delay is the payment terms period: if the payment terms are 14 days, then these 14 days must pass before you can decide that the invoice is unpaid and requires follow-up.
The initial version of this process creates the Check for payment task immediately after sending the invoice, with the due date set to 14 days later. The disadvantage of that approach is that it pollutes the tasks inbox with tasks that cannot be completed immediately. You might prefer that Effektif only creates the Check for payment task after the end of the payment terms period.
Effektif 3.6 adds the BPMN 2.0 ‘intermediate timer event’ that lets you add this waiting time. To add the timer to your process, in the the process builder, select Intermediate timer event in the tool palette:
![]()
Add the timer to the process where you wait to add waiting time to the process flow. In this case, before the Check for payment task:

Select the timer event to configure it, by naming the event and entering the period to wait:
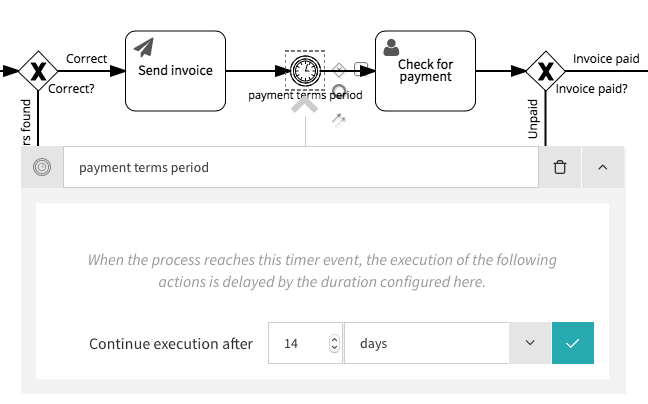
Now, when you run the process, Effektif will create the Check for payment task 14 days after sending the invoice.
Sub-process
In the Invoice customer process, when the customer has not paid the invoice within the payment terms period, the process creates a Chase late payment task. The first version of the process models this as a user task. However, in practice, you may want to model this as a separate Recover late payment process that appears as a single sub-process action in the process model.
Modelling a task as a separate process has two benefits. You can use sub-processes to simplify complex process models, by collapsing each sub-process into a single action. Then you can open the sub-process to see the next level detail. The second benefit is that the sub-process may have a different process owner, and be maintained by different people. You will find this useful when you delegate responsibility for a sub-process to someone else, or a different department in your organisation.
Effektif 3.6 adds the BPMN 2.0 ‘Sub-process (collapsed)’ action, that you can use to link a process action to a sub-process. To add a sub-process action to your process, in the the process builder, select Sub-process in the tool palette:
![]()
Add the sub-process to the process instead of a user task, to model a task that represents a complete execution of another process.

Configure the sub-process action by selecting it, and choosing another published process from the list. You cannot select the same process as the parent process, which would cause a loop, or an unpublished process.
Now, when you run the Invoice customer process, Effektif will start a new case in the selected sub-process after sending the reminder. When the sub-process case is complete, Effektif will continue the parent case, continuing to the invoice closed end event, in this example.
Cases overview CSV export
When you’ve been using a process for a while, you’ll want an overview of both current cases and completed work. For the Invoice customer process, you need an overview of customer invoices. In Effektif, the Cases view gives you this overview.

The Cases view gives you a convenient overview of open and closed cases. However, if you have a large number of cases, or a large number of variables for each case, then you will likely prefer to open this data in a spreadsheet.
Effektif 3.5 added CSV export to the Cases view. Select the Export as CSV option, and choose a sort order and whether to include open or closed cases.
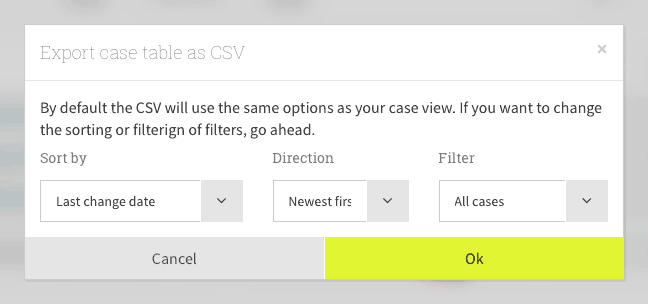
Select OK to generate a CSV export that you can open in a spreadsheet tool:
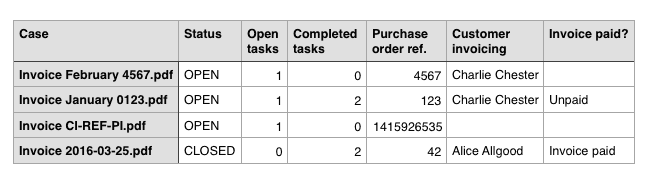
The export includes columns for the case name, case status, the number of open and completed tasks, and each of the process variables.
Photo: Kiran Foster / CC BY 2.0