


When you use a workflow automation platform like Signavio Process Governance, you sometimes want a workflow to update another system in the organisation. Every time your company receives a customer order, for example, you want the order fulfilment process to update a giant scoreboard in the office that shows the number of orders placed that day. This is a job for web service integration.
This article describes how you can connect a workflow to another application’s database. As a simple example, the web service integration will capture the identifier of every case when it starts to record ‘case started’ events.
The source code and documentation for this example is available at https://github.com/signavio/connector-examples/tree/master/java/database-update
Web service integration architecture
Web service integration is a completely flexible way to publish data from a workflow to other systems in the organisation. This makes it possible for workflows to automatically update other systems.
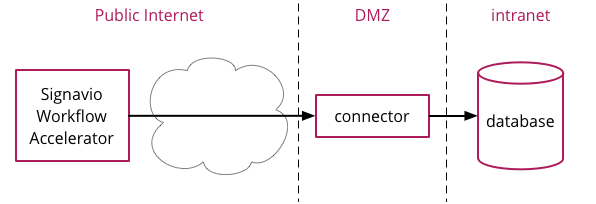
In this architecture, the workflow sends data to a connector that acts as a proxy for the database. The organisation that owns the database will typically deploy the connector in a DMZ, to avoid the risk of making the database available on the public Internet. Alternatively, you could host both the database and the connector in the cloud.
Writing a web service in Java
The connector is a simple web service that updates the database. Specifically, it must provide:
- An HTTP API that accepts HTTP requests from the public Internet, such as an HTTP POST request containing data that will be used to insert rows in the database.
- A database connection and a way to execute database updates, typically using SQL.
Java is one of many common choices for building this kind of connector. There are many Java libraries and frameworks that you can use to implement the HTTP interface, and connect to a database. The example connector (source code) uses the Spark Framework for HTTP, and JDBC to connect to a MySQL or PostgreSQL relational database using the databases’ JDBC drivers.
In practice, you can also build a connector with a different programming language and its associated libraries, or use a non-relational database. The best choice for this kind of task is typically whatever the developers are most familiar with.
Deploying the web service
If you want to use the database-update example connector yourself, you’ll first need to deploy it somewhere. To deploy the example connector on Heroku, follow the detailed instructions in the example’s README, which describes the following steps.
- Download the example code.
- Make a copy of the ‘database-update’ update directory to deploy.
- Initialise a git repository to deploy to Heroku.
- Deploy the application to Heroku by pushing the git repository.
- Create the table in the Heroku PostgreSQL database.
Test that the installation worked by sending an HTTP request to publish a case started event, using an HTTP client such as HTTPie:
http post
The result should be an HTTP response with a ‘201 CREATED’ status:
HTTP/1.1 201 Created
Connection: close
Content-Type: text/html;charset=utf-8
Date: Thu, 17 Aug 2017 09:05:40 GMT
Server: Jetty(9.4.4.v20170414)
Via: 1.1 vegur
Now check that the case started event was added to the database:
$ heroku pg:psql
--> Connecting to postgresql-blackberry-12345
psql (9.6.4, server 9.6.1)
database-update::DATABASE=> select * from case_event;
id | case_id |         created         |  type
----+---------+-------------------------+---------
1 | 42      | 2017-08-17 09:07:08.563 | started
(1 row)
Now that the connector works, you can send it data from a workflow.
Calling the web service from a workflow
To send data to the connector every time a case starts, configure a script task at the start of the process to send the HTTP request. In the script configuration, add the ‘Case’ variable, so you can access the case ID.
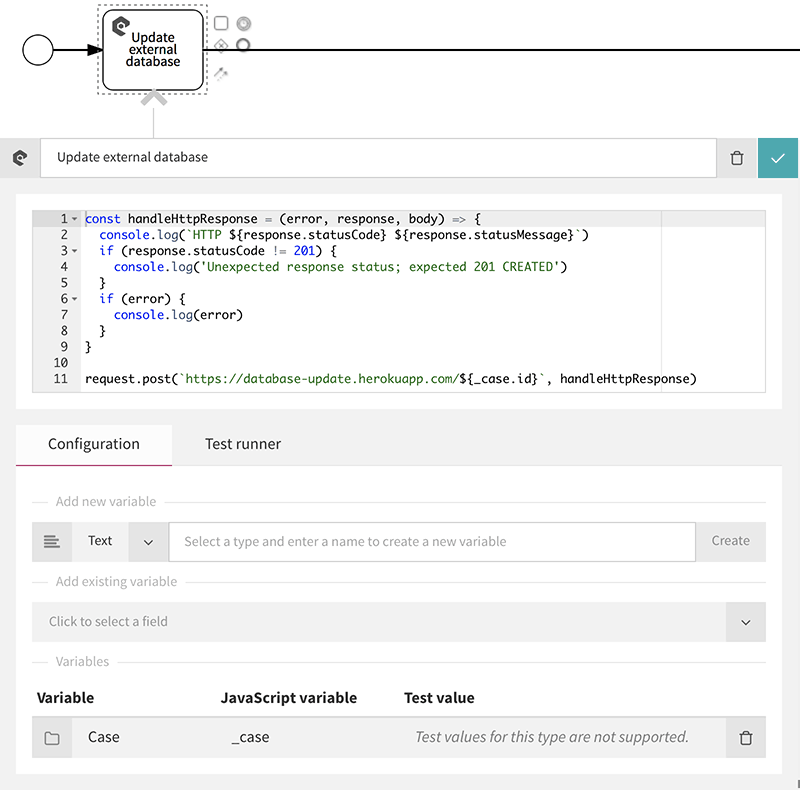
The example’s README includes the JavaScript source code shown here, so you can copy-paste it.
Now publish the process, start a new case, and check the database again to see the new case event.
database-update::DATABASE=> select * from case_event;
id |         case_id          |         created         |  type
----+--------------------------+-------------------------+---------
1 | 42                       | 2017-08-17 09:07:08.563 | started
2 | 59955edfd1dfff2afffe4dd6 | 2017-08-17 09:16:16.795 | started
(2 rows)
The second row includes the ‘case_id’ from the new workflow case. To extend the example, you could include more information in the HTTP request and in the database table, such as the case name or trigger form data.
Integrating workflows with enterprise IT systems
Writing a small web service that acts as a ‘connector’ between systems is a common approach to web service integration. In this case, the connector integrates a workflow’s JavaScript action with a relational database. You can extend this example with just about any functionality you like.
Try your own web service integration with Signavio Process Governance, and register for a free 30-day trial today.