


Documents and approvals are regular features in business process automation. Sometimes, document approvals require an additional step: signing the document to record the approval. DocuSign provides a common solution to this requirement: secure electronic signatures for documents. This article describes how you can integrate a DocuSign workflow in your approval processes by writing JavaScript code to access the DocuSign API.
DocuSign workflow
The following process model diagram shows one way to implement a DocuSign workflow with Signavio Process Governance as part of a contract approval. In this model, the process starts with a request to approve a contract. The ‘Approve contract’ task at the start of the the process is a manual decision that results in either approval or rejection.
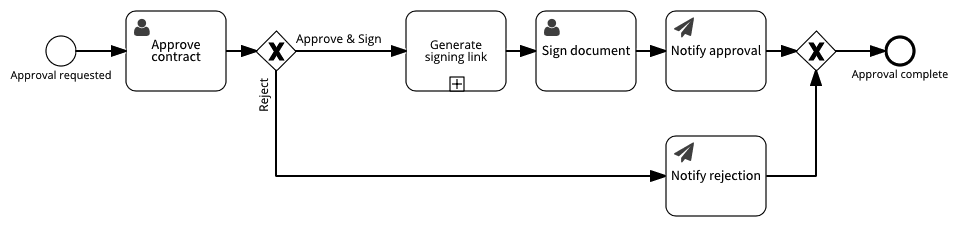
The difference between this example and a basic document approval is that this process includes a task for signing the approved document. First, the ‘Generate signing link’ sub-process uploads the contract to DocuSign and generates a link to the web page on the DocuSign web site that you can use to sign the document.
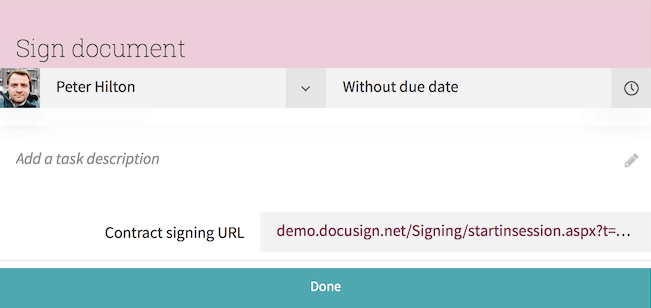
The ‘Sign document’ task displays this link, and is complete when the contract ‘approver’ has signed the document.
Using the DocuSign API
The rest of this article is a step-by-step guide to setting up a DocuSign workflow to prepare a document for signing, following the steps in the DocuSign API Quick Start. To do this, use Process Governance JavaScript actions to access the DocuSign API. This consists of three steps, each of which requires sending one HTTP request to the API:
- Log in to the API
- Create an envelope with an embedded recipient
- Create recipient view
These three steps are also a convenient way to set-up a process in Process Governance. This process encapsulates DocuSign API access, so you can call it as a sub-process.

To set-up this process in Process Governance:
- Create a new process called ‘Generate DocuSign signing link’
- On the ‘Actions’ tab, add a start event, three script tasks, and an end event, in sequence.
- On the ‘Trigger’ tab, add a form trigger.
- On the form trigger, add a ‘File’ field called ‘Document’ for the document that requires a signature.
- Add a ‘User’ field called ‘Signer’ for the person who will sign the document.
The result of this process is a ‘Recipient view URL’ variable - a ‘Link’ variable containing the address of the web page that the signer can use to sign the document.
Each of the following sections will explain what each of these steps means. Before you start, however, you need to create a DocuSign developer account that you will use to access the DocuSign API.
Logging in to the DocuSign API
The ‘Log in to API’ JavaScript action logs into the DocuSign API. The inputs are the user credentials included within the script. The output is a ‘Base URL’ - a ‘Link’ variable whose value is the common prefix for the API URLs that subsequent HTTP requests will use.
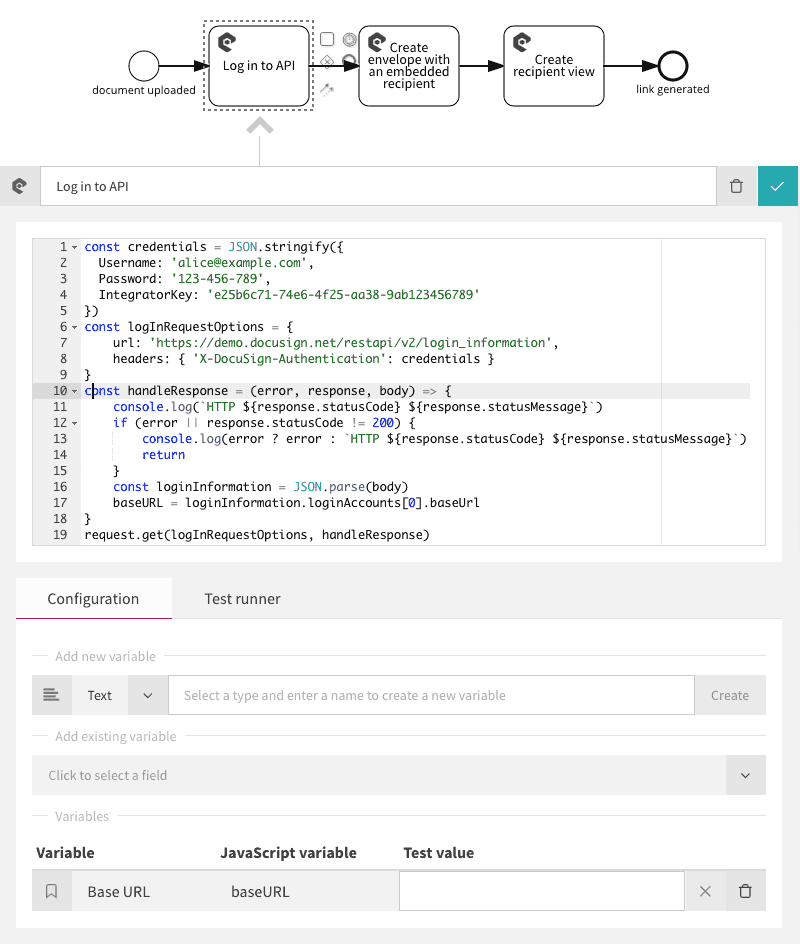
To configure this JavaScript action:
- Under the ‘Add new variable’ heading, change the variable type to ‘Link’, enter the variable name ‘Base URL’, and click the ‘Create’ button.
- Paste the following script into the code window.
- In the script, on lines 2-3, replace the user name and password string values with your DocuSign developer account user name and password.
- In the DocuSign API Quick Start, follow the instructions for ‘2. Generate your Integrator Key’
- In the script, on line 4, replace the integrator key string value with the generated key.
The complete script is as follows.
const credentials = JSON.stringify({
  Username: 'alice@example.com',
  Password: '123-456-789',
  IntegratorKey: 'e25b6c71-74e6-4f25-aa38-9ab123456789'
})

const logInRequestOptions = {
  url: 'https://demo.docusign.net/restapi/v2/login_information',
  headers: { 'X-DocuSign-Authentication': credentials }
}

const handleResponse = (error, response, body) => {
  console.log(`HTTP ${response.statusCode} ${response.statusMessage}`)
  if (error || response.statusCode != 200) {
    console.log(error ? error : `HTTP ${response.statusCode} ${response.statusMessage}`)
    return
  }
  const loginInformation = JSON.parse(body)
  baseURL = loginInformation.loginAccounts[0].baseUrl
}

request.get(logInRequestOptions, handleResponse)
This script has four parts:
- ‘credentials’ contains the credentials for authenticating with the API.
- ‘logInRequestOptions’ contains the API request structure - the log in URL and the custom HTTP authentication header that contains the credentials.
- ‘handleResponse’ is the callback function that will process the API’s HTTP response, by logging the response, and setting the ‘Base URL’ variable to the value in the response body.
- The call to ‘request.get’ that sends the HTTP GET request to the API.
To test the script:
- Select the ‘Test runner’ tab.
- Clicking the ‘Start new test’ button.
The test output should include a value for the ‘baseURL’ variable in the ‘Update value’ column.
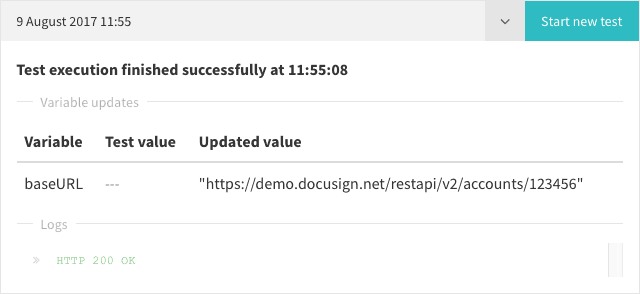
Now you have a base URL for your DocuSign demo account, you can use it to send more API requests.
Creating an envelope with an embedded recipient
After you’ve logged in to the DocuSign API, the next step is to create a DocuSign ‘envelope’. An envelope is a container for documents that require signatures, and is addressed to one or more ‘recipients’. For this example, create an envelope that contains one document and is addressed to one recipient.
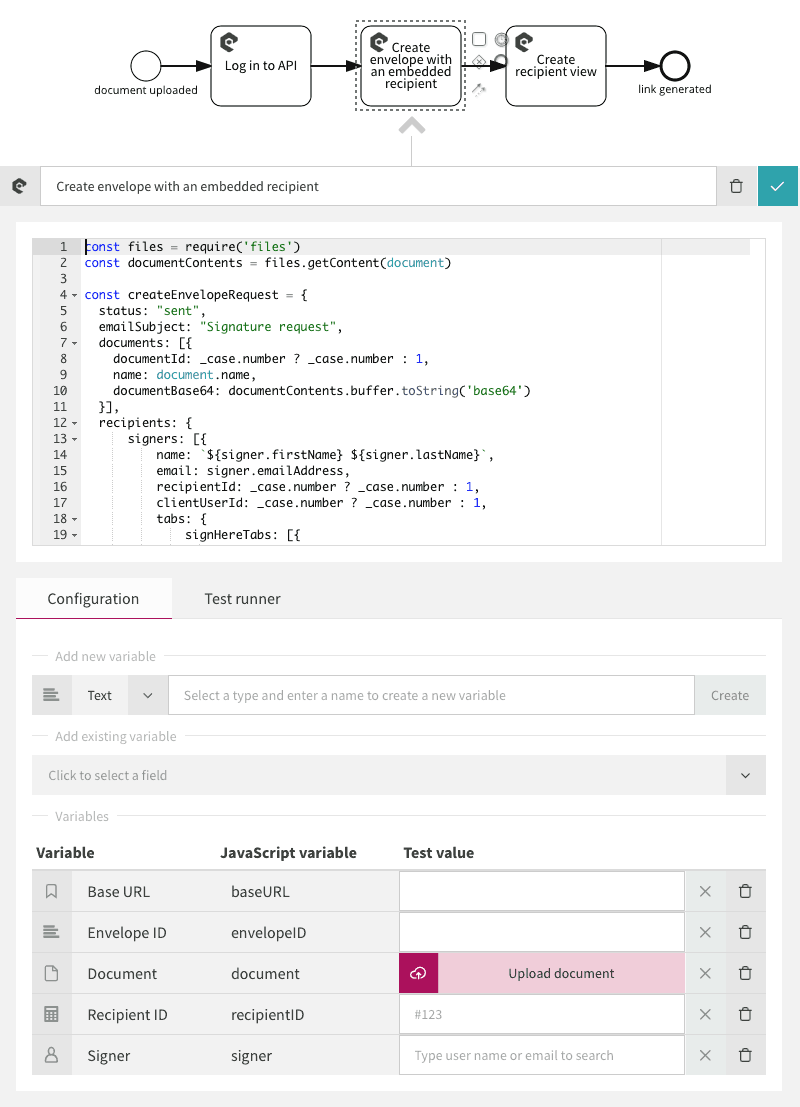
To configure this JavaScript action:
- Under the ‘Add existing variable’ heading, select the ‘Document’ and ‘Signer’ variables from the trigger form, and the ‘Base URL’ variable from the previous JavaScript action, and the ‘Case’ variable.
- Under ‘Add new variable’, create a new ‘Text’ variable called ‘Envelope ID’, to identify the envelope that this JavaScript action will create.
- Create a new ‘Number’ variable called ‘Recipient ID’, to allow DocuSign identify the signer.
- Paste the following script into the code window.
const files = require('files')
const documentContents = files.getContent(document)

const envelopeDefinition = {
  status: "sent",
  emailSubject: "Signature request",
  documents: [{
    documentId: _case.number ? _case.number : 1,
    name: document.name,
    documentBase64: documentContents.buffer.toString('base64')
  }],
  recipients: {
    signers: [{
      name: `${signer.firstName} ${signer.lastName}`,
      email: signer.emailAddress,
      recipientId: _case.number ? _case.number : 1,
      clientUserId: _case.number ? _case.number : 1,
      tabs: {
        signHereTabs: [{
          xPosition: "25",
          yPosition: "50",
          documentId: _case.number ? _case.number : 1,
          pageNumber: "1",
          recipientId: _case.number ? _case.number : 1
        }]
      }
    }]
  }
}

const credentials = JSON.stringify({
  Username: 'alice@example.com',
  Password: '123-456-789',
  IntegratorKey: 'e25b6c71-74e6-4f25-aa38-9ab123456789'
})

const apiRequestOptions = {
  url: `${baseURL}/envelopes`,
  headers: {
    'Content-Type': 'application/json',
    'X-DocuSign-Authentication': credentials,
  },
  body: JSON.stringify(envelopeDefinition)
}

const handleApiResponse = (error, response, body) => {
  if (error || response.statusCode != 201) {
    console.log(error ? error : `HTTP ${response.statusCode} ${response.statusMessage}`)
    console.log(body)
    return
  }
  const envelope = JSON.parse(body)
  envelopeID = envelope.envelopeId
}

request.post(apiRequestOptions, handleApiResponse)
Although it is longer, this script has the same structure as the log in script.
- ‘documentContents’ is assigned using the ‘files’ library to read the contents of the ‘document’ file.
- ‘envelopeDefinition’ defines the envelope, using the envelopeDefinition format described in the API documentation.
- ‘envelopeDefinition.documents.documentId’ uses the numeric case number to identify the document. You cannot use the ‘document.id’ property directly, because it has the wrong format and the API requires an integer or a UUID.
- ‘envelopeDefinition.documents.documentBase64’ uses Base-64 encoding to encode the document file contents and include it directly in the envelope definition.
- ‘envelopeDefinition.recipients.signers.tabs’ defines the ‘DocuSign tabs’ - the document locations where the recipient must add a signature.
- ‘apiRequestOptions.body’ includes the envelope definition in the JSON request body.
- ‘handleApiResponse’ extracts the ‘Envelope ID’ from the API HTTP response body.
- The last line sends the HTTP POST request to the API.
To test the script:
- Open the ‘Log in to API’ action, select ‘Test runner’ and click ‘Start new test’.
- Copy the ‘Base URL’ value from the ‘Updated value’ column.
- Open the ‘Creating an envelope with an embedded recipient’ action.
- Paste the ‘Base URL’ value into the variable’s test value field.
- In the ‘Document’ variable’s test value field, upload a PDF document.
- In the ‘Signer’ variable’s test value field, select your own user.
- Select ‘Test runner’ and click ‘Start new test’.
- Copy the value for the ‘envelopeID’ variable from the ‘Variable updates’ table’s ‘Update value’ column, for use as test data in the next JavaScript action.
Now that you have created an envelope by uploading a document, you can use DocuSign to sign the document.
Creating a recipient view
After you have packaged a document in an envelope, you can use the DocuSign website to sign it. To do this from a DocuSign workflow, you need to generate the URL of the web page where the designated signer (the DocuSign ‘recipient’) can sign the document in the envelope. DocuSign calls this web page a ‘recipient view’.
You can create a recipient view the same way that you create an envelope: by sending an HTTP POST to the DocuSign API, whose request body contains the JSON representation of a recipientViewRequest.
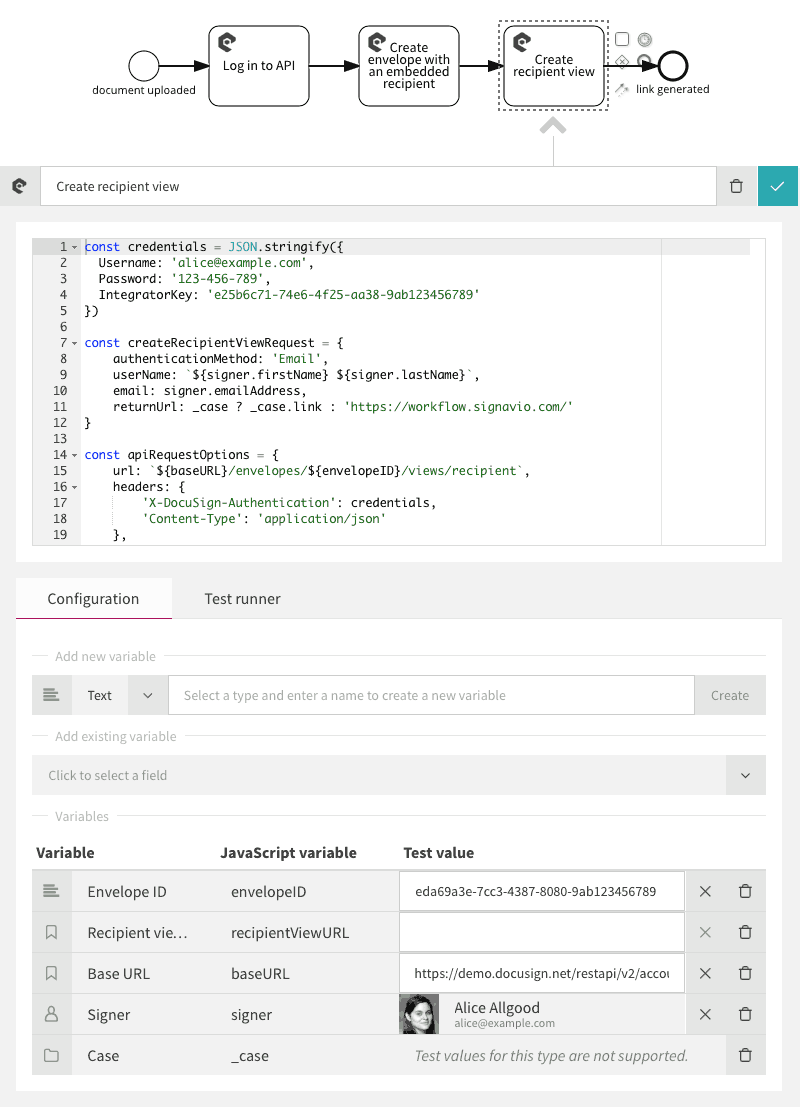
To configure this JavaScript action:
- Add existing variables: ‘Base URL’, ‘Envelope ID’, ‘Signer’ and ‘Case’.
- Paste the ‘Envelope ID’ value from the ‘Creating an envelope with an embedded recipient’ action’s test.
- Create a new ‘Link’ variable called ‘Recipient view URL’.
- Paste the following script into the code window.
const credentials = JSON.stringify({
  Username: 'alice@example.com',
  Password: '123-456-789',
  IntegratorKey: 'e25b6c71-74e6-4f25-aa38-9ab123456789'
})

const recipientViewRequest = {
  authenticationMethod: 'Email',
  userName: `${signer.firstName} ${signer.lastName}`,
  email: signer.emailAddress,
  returnUrl: _case.link ? _case.link : 'https://workflow.signavio.com/',
  recipientId: _case.number ? _case.number : 1,
  clientUserId: _case.number ? _case.number : 1,
}

const apiRequestOptions = {
  url: `${baseURL}/envelopes/${envelopeID}/views/recipient`,
  headers: {
    'X-DocuSign-Authentication': credentials,
    'Content-Type': 'application/json'
  },
  body: JSON.stringify(recipientViewRequest)
}

const handleApiResponse = (error, response, body) => {
  if (error || response.statusCode != 201) {
    console.log(error ? error : `HTTP ${response.statusCode} ${response.statusMessage}`)
    console.log(body)
    return
  }
  const recipientView = JSON.parse(body)
  recipientViewURL = recipientView.url
}

request.post(apiRequestOptions, handleApiResponse)
The ‘recipientViewRequest’ data identifies the recipient, and how they have authenticated, and includes the URL of the case in Process Governance, where the signer will be redirected after signing the document.
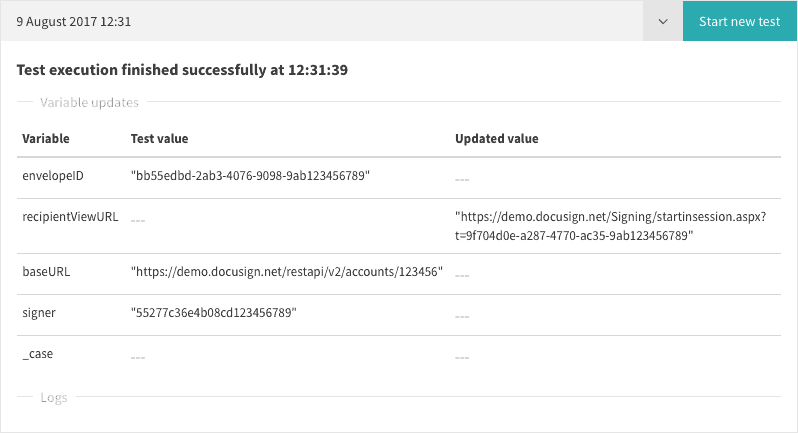
To test the script:
- Use the ‘Base URL’ value you used to test the previous script.
- Use the ‘Envelope ID’ value generated by the previous script.
- Use the same ‘Signer’ - your own user.
- Select the ‘Test runner’ tab and click ‘Start new test’.
After running the test the ‘Update value’ column should include the ‘recipientViewURL’ value extracted from the API response.
Open the recipient view URL in a web browser to sign the document using DocuSign.
Finally, publish the process so you can run it from the document approval process.
Signing documents in the approval process
Now that you have published the ‘Generate DocuSign signing link’ process, you can configure it as the ‘Generate signing link’ sub-process in the contract approval DocuSign workflow:
Select the ‘Generate signing link’ sub-process, and configure it by selecting the ‘Generate DocuSign signing link’ process and mapping the trigger form fields to the ‘Document’ and ‘Signer’ fields. First create these trigger form fields if you haven’t already done so.
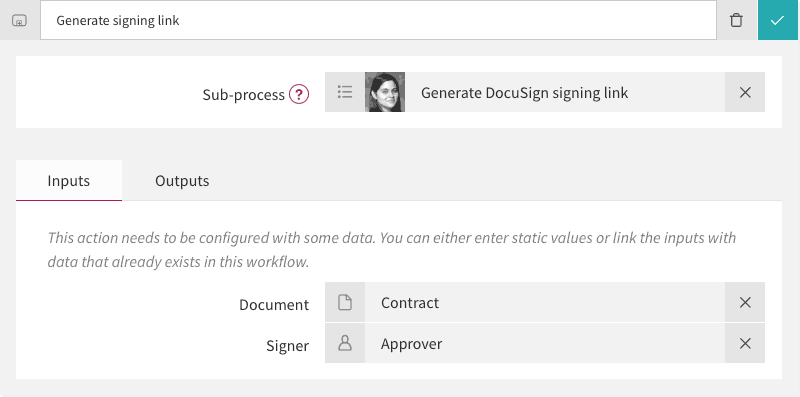
Select the ‘Outputs’ tab and select the sub-process’ ‘Recipient view URL’ variable. Rename it to ‘Contract signing URL’ for the parent process.
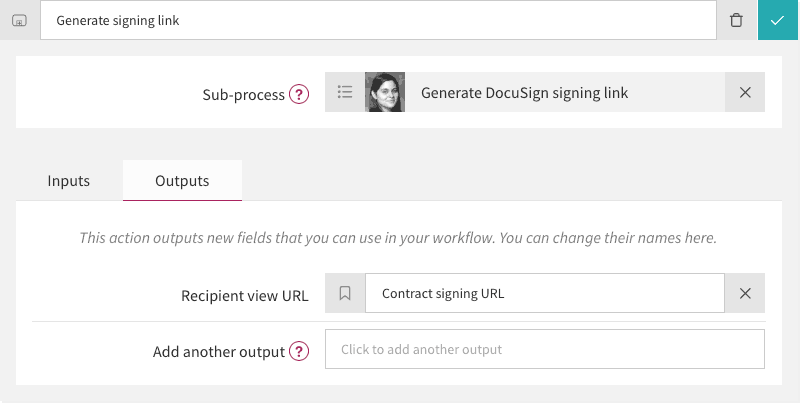
Now, configure the ‘Sign document’ task by adding the existing ‘Contract signing URL’ variable to the form. Set the field ‘Read-only’.
Finally, you can see the DocuSign workflow in action.
- Publish the process and start a new case.
- Complete the ‘Approve contract’ task by approving the document.
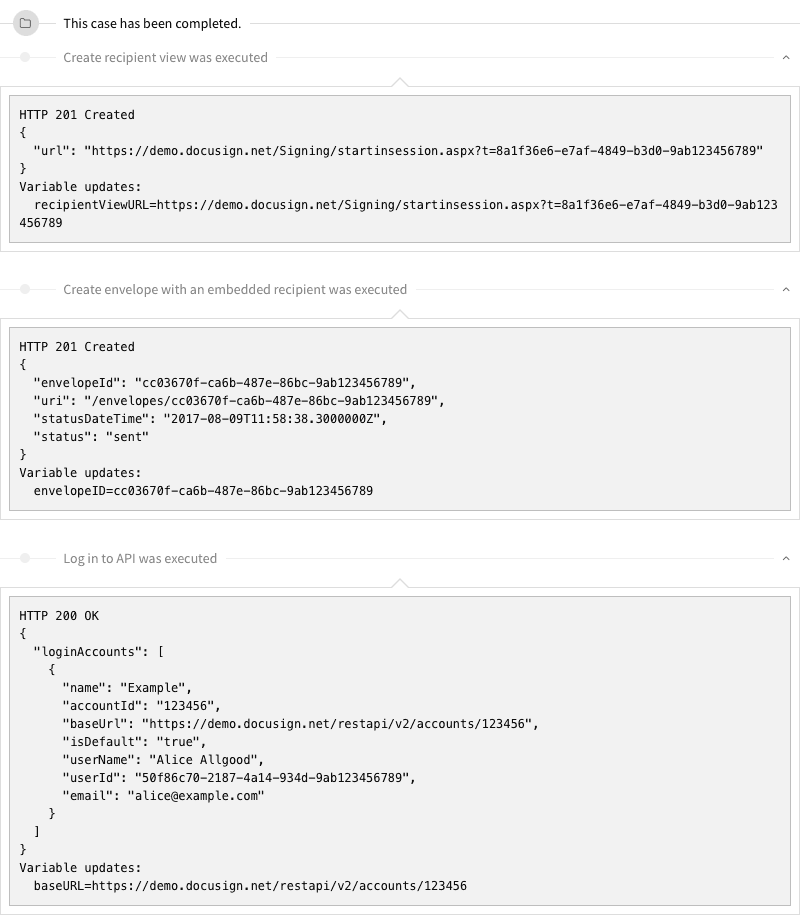
- Wait a few seconds and press ‘R’ on the keyboard to refresh the case view. The case view’s event stream should now show that the ‘Generate signing link’ sub-process was started.
- Click the link in the event stream to open the sub-process case.
- On the sub-process case view( in the event stream) expand the JavaScript actions to see their log output. This should look like the following, showing the HTTP responses from the DocuSign API, and the actions’ variable updates.
To finish up the DocuSign workflow, use DocuSign to sign the document:
- Go back to the parent case.
- Open the ‘Sign document’ task.
- Open the ‘Recipient view URL’.
- Use the DocuSign interface to sign the document.
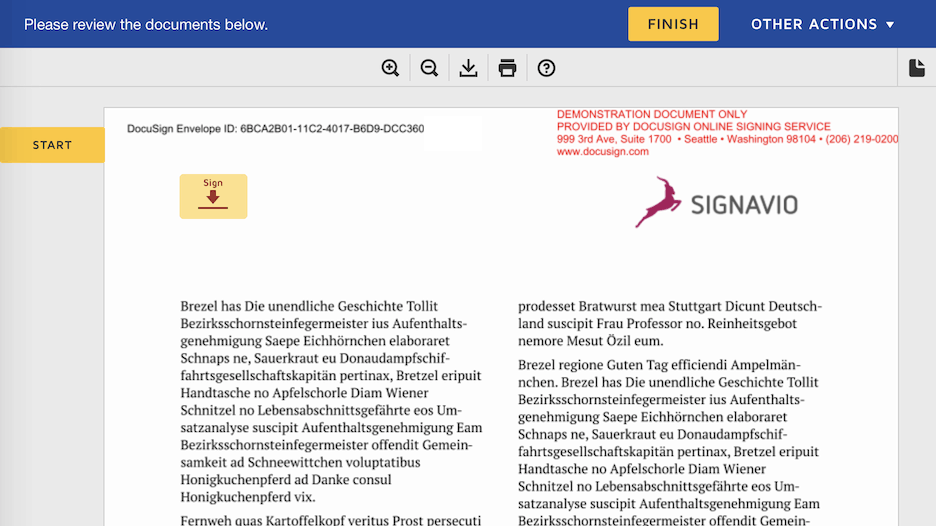
On this ‘recipient view’ the DocuSign tab is the yellow button on the document labeled ‘Sign’ with a downward arrow.
The recipient view URL expires after a short period, so in practice it would be necessary to add a decision after the ‘Sign document’ task to choose between ‘Document Signed Successfully’ and ‘Retry’. The latter case should loop back to the ‘Generate signing link’ sub-process action.
Integrating workflows with third-party APIs
This DocuSign workflow example shows that you can use JavaScript actions to integrate your workflows with third-party services, to add sophisticated functionality to your workflow automation. This is an advanced technique that requires some coding, but much less than traditional enterprise application integration.
SAP Signavio Process Governance's integrated JavaScript actions and test runner greatly reduce set-up effort for developers. Instead of setting-up a development environment and their own testing infrastructure, developers can focus on writing a small amount of integration code.
To get started using SAP Signavio Process Governance with a DocuSign workflow, then register for a free 30-day trial today.